A 60 degree angle cut on a table saw can be a challenging cut for even the most experienced carpenter. The key to successfully making this cut is to have a sharp saw blade and to take your time.
In this blog post, we will show you how to cut a 60-degree angle on a table saw. We will also take a look at measuring 60-degree angles in different ways. This cut is often used for picture frames, molding, and other woodworking projects.
Tools needed to make A 60 Degree Angle On A Table Saw?
- Table saw Miter gauge
- Crosscut sled
- T-bar clamp or another clamping device
- 60-degree angle template
- Pencil or chalk
- Tape
How To Cut A 60 Degree Angle On A Table Saw?
Step 1: Measure and mark
Before you start cutting, you need to take some measurements and make a few marks.
First, you’ll need to decide how wide you want your piece to be. Measure the width of your workpiece and then add 1”. This will be the measurement for your miter gauge. For example, if your workpiece is 6” wide, you’ll want to set your miter gauge to 7”.
Next, you’ll need to make a mark at the very back of your workpiece. This will be your reference point for determining your cut. Make sure this mark is perpendicular to the edge of your workpiece.
Step 2: Set up your sled
If you’re using a crosscut sled, set it up now. If you’re not using a sled, you can skip this step.
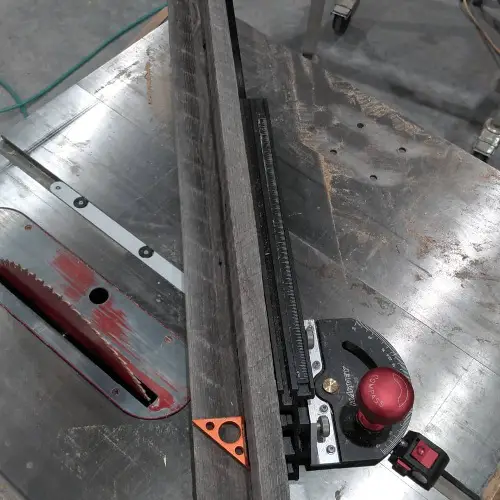
Step 3: Set up your miter gauge
Attach your miter gauge to your table saw. Then, set the miter gauge to the measurement you took in Step 1.
Step 4: Set up your clamp
Attach your clamping device to the back of your workpiece. Make sure it’s securely in place.
Step 5: Cut your angle
Slowly and carefully, make your cut. Remember to keep your hands clear of the blade. If you’re using a sled, push the sled forward until the blade cuts through your workpiece. If you’re not using a sled, you’ll need to hold your workpiece in place as you make your cut.
Step 6: Remove your workpiece
Carefully remove your workpiece from the table saw. Be careful not to touch the blade.
Your piece should now be cut at a 60-degree angle. Congratulations! You’ve just learned how to cut a 60-degree angle on a table saw.
Additional Tips:
If you’re having trouble making a clean, straight cut, try using a sharp carbide-tipped blade. A dull blade will make it more difficult to get a clean, precise cut.
Check the size of your workpiece if your workpiece is too small to attach a clamping device, you can try using double-sided tape. Just be careful not to use too much tape, or your workpiece could get stuck to the blade.
If you don’t have a miter gauge, you can use a combination square. Set the square so that the blade is touching the back of your workpiece, then make your cut.
Remember to always use caution when operating a table saw. Always wear safety goggles and keep your hands clear of the blade. If you’re not comfortable using a table saw, consider having someone else do it for you.
You may also want to check out this link for more clarity: https://www.youtube.com/watch?v=wngAoA7Cek0
Tips for cutting a 60-degree angle accurately.
Cutting a 60-degree angle is something that can be done with a few different tools, but a table saw is the most common tool used.
There are a few different ways to measure and cut a 60-degree angle, but the most critical thing is to be accurate. Here are some tips on how to measure and cut a 60-degree angle accurately:
1. Use a protractor or angle finder to measure the angle you need to cut.
2. Set your miter gauge to the correct angle.
3. Cut slowly and carefully.
4. Use a stop block to ensure that your cuts are precise.
5. Test your cuts with a scrap piece of wood before cutting your project pieces.
How do you measure a 60-degree angle to cut On A Table Saw?
There are a few different ways that you can measure a 60-degree angle to cut on a table saw.
1. Use a protractor
A protector is a tool specifically designed for measuring angles. Here’s how to do it:
Step 1: To use a protractor, first, align the base of the protractor with one side of the wood that you’re going to be cutting.
Step 2: Then, align the 60-degree mark on the protractor with the other side of the wood.
Step 3: Read the measurement at the bottom of the protractor to see what the angle is.
2. With a combination square
It has a built-in protractor that can be used for this purpose. Here’s how to use a combination square:
Step 1: Align the blade of the square with one side of the wood that you’re going to be cutting.
Step 2: Then, rotate the square until the built-in protractor reads 60 degrees.
Step 3: The right side is the bottom of one of the squares, and it gives a measurement. Read that number to determine the angle.
Step 4: Use a pencil to mark the wood at the measurement.
Step 5: Cut along the line that you’ve just marked.
With a combination square, you can easily find and mark 60-degree angles on your wood.
3. By using a Ruler or another Straight Edge
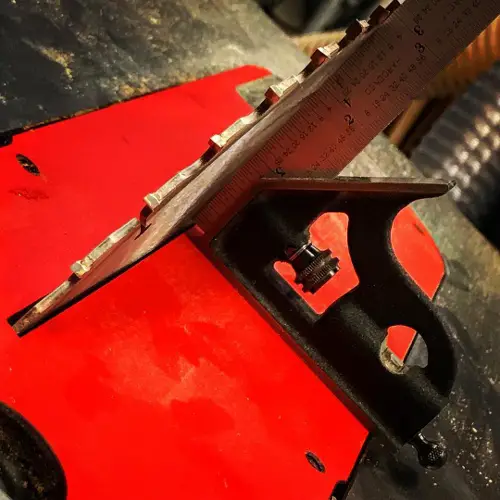
You can also use a simple ruler or tape measure to measure the angle. This is probably the most common way that people measure and cut 60-degree angles. Here’s how to do it:
Step 1: Place a ruler or other straight edge along one side of the wood that you’re going to be cutting.
Step 2: Then, use a pencil to mark a point on the wood or any workpiece that’s 2 inches (5.1 cm) from the edge of the wood.
Step 3: Next, draw a line from that point to the opposite side of the wood.
Step 4: Then, use a saw to cut along the line that you’ve just drawn.
Step 6: You are all done.
You now have several methods to measure a 60-degree angle and have very little chance of making an error.
FAQs
How to use a miter gauge to cut a 60-degree angle?
To use a miter gauge to cut a 60-degree angle, first align the miter gauge with the blade of the saw. Then, adjust the miter gauge until it reads 60 degrees. Now, push the wood through the blade to cut.
Why it’s so crucial to know how to cut a 60-degree angle.
It’s very handy to know how to cut a 60-degree angle because this is a common angle that is used in many different woodworking projects. Knowing how to properly measure and cut this angle will ensure that your project turns out to look professional and precise.
How do you make sure your cuts are accurate?
To make sure your cuts are accurate, it is imperative to use a quality miter gauge and to measure the angle carefully before cutting. Additionally, it is helpful to use a marking tool to mark the wood before cutting it so that you have a reference point to guide your saw.
Conclusion
Cutting a 60-degree angle on a table saw is a simple process that can be completed in a few steps. By following the steps outlined in this blog post, you can easily make this cut at home. It can be tricky, but with a bit of practice, it’s something that anyone can do. Just remember to take your time, measure twice, and cut once!

I am William Anderson and I’m the founder of this website. I started this site because I was tired of dealing with the problems that come with using Saw Tools. I wanted to help others avoid the time and frustration I had, So I started this site based on my own experience and what I’ve learned from other professionals and resources.