The best way to cut wood at a 45-degree angle is to use a 45-degree miter saw. When you need to cut a 45-degree angle on wood, you might think about using a miter box, a miter saw, or even a table saw sled. But do you know the best way to cut a 45-degree angle on a circular saw? We’ll explain how below, along with the pros and cons of different techniques.
If you’re looking to cut a 45-degree miter with a circular saw, there are a few things you’ll need to keep in mind. First, you’ll need to make sure that your saw is properly calibrated. Next, you’ll need to mark your cut line on the piece of wood you’re working with. Have your line marked you’ll need to set the depth of your saw blade to half of the thickness of the wood. Finally, you’ll need to make your cut, being careful to keep the saw blade perpendicular to the wood.
Difference between Bevel and Miter 45-Degree Cuts
There is a slight difference between bevel and miter 45-degree cuts. Bevel cuts are made at an angle to the workpiece while miter cuts are made at a 90-degree angle. When cutting molding or baseboard, you’ll want to use a bevel cut so that the molding sits flush against the wall. For picture frames, you’ll want to use a miter cut so that the corners of the frame are nice and sharp.
How to Use a Circular Saw to Cut a 45-Degree Angle?

A circular saw is a great tool for cutting a variety of materials, including wood, metal, and plastic. When cutting at a 45-degree angle, it’s important to use a guide to ensure a precise cut. To use a circular saw to cut a 45-degree angle:
1. Mark the desired angle on the material you’re cutting.
2. Place the saw against the material at the marked angle, with the blade facing the direction you want to cut.
3. Slowly and carefully guide the saw along the material, keeping the blade at the marked angle.
4. When you reach the end of the cut, release the trigger and allow the saw to come to a complete stop.
5. Carefully remove the material and inspect the cut. If necessary, make any adjustments and repeat the process until you’re satisfied with the results.
Choose the Type of Cut
There are three main types of cuts: straight, angled, and curved. Each has its own advantages and disadvantages, so you need to choose the right one for your project.
Straight cuts are the simplest and most common type of cut. They’re easy to make and don’t require any special tools or skills. However, they’re not as versatile as other types of cuts, so you may not be able to use them for all of your projects.
Angled cuts are more difficult to make than straight cuts, but they’re more versatile. You can use them for a variety of projects, and they can give your project a more professional look. However, you’ll need to have the right tools and skills to make angled cuts.
Curved cuts are the most difficult to make, but they’re also the most versatile. You can use them for a variety of projects, and they can give your project a more unique look. However, you’ll need to have the right tools and skills to make curved cuts.
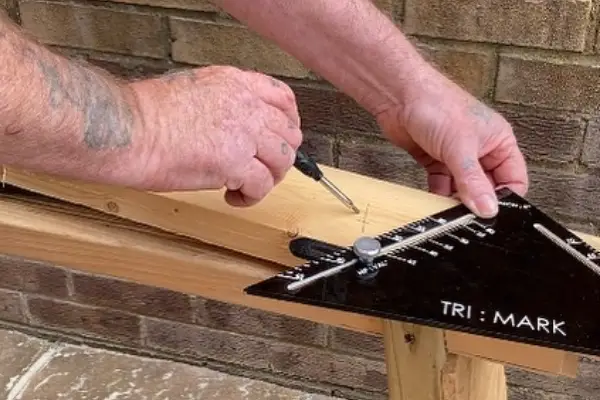
Measure and Mark the Piece
In order to measure and mark the piece, you will need to first find the center point of the piece. To do this, you will need to measure the width and length of the piece. Once you have found the center point, you will need to mark it with a pencil or pen.
Next, you will need to measure the width and length of the piece again, but this time you will need to measure from the center point that you just marked.
Set the Depth of Cut
When you’re ready to set the depth of the cut, there are a few things to keep in mind. First, you’ll need to determine the maximum depth of cut for your material. Second, you’ll need to set the depth of the cut so that it’s shallow enough to prevent the material from being damaged. Finally, you’ll need to make sure that the depth of cut is appropriate for the tool you’re using.
Line up the Board and Set the Saw Guide
After you have positioned the board on the saw and adjusted the blade to the appropriate depth, you will need to line up the board with the saw guide. The saw guide is the metal bar that runs along the length of the blade. To line up the board, you will need to align the board with the saw guide so that the blade will cut through the board evenly. Once the board is lined up, you can set the saw guide to the desired width.
Conclusion
Cutting a 45-degree miter with a circular saw is difficult but if you follow the steps in this guide, you should be able to do it with ease. When altering the saw blade’s angle, make sure it is disconnected. To cut, use a sharp blade. The cleaner finish you receive from sharpening your circular saw blade is worthwhile.
Never trail too closely behind or approach the running blade too closely to avoid injury in the event of a backfire. The whole saw kicks back at you when the back of the blade grabs holds of the wood. Because kickback is so dangerous, it must be avoided.
We hope that this guide has been helpful for you. If you have any questions, please feel free to ask in the comments section below. Also, check out our more informative saws related articles on our website.

I am William Anderson and I’m the founder of this website. I started this site because I was tired of dealing with the problems that come with using Saw Tools. I wanted to help others avoid the time and frustration I had, So I started this site based on my own experience and what I’ve learned from other professionals and resources.